
Youtube 임베딩을 이용해서 내 사이트에 영상을 공유하는 일이 있을 수가 있는데, 유튜브 티가 난다면 싫을 수도 있을 수 있..다!?그런 경우 어떤 방법으로 해결할 수 있을까?먼저 CSS를 이용해서 !import를 같은 또는 JS를 이용해서 임베딩된 Youtube UI를 손을 쓸 수가! 없다.이유는 Cross Origin 문제로 그렇다.Youtube Iframe API를 이용하며 된다.이미지가 대충 안 맞는데 얼추 맞다. 그래도 가능..! START
해당 기능을 구현 시 동작: 뒤로가기 시 실제 URL은 변경되지 않고, 렌더링을 통해 뒤로가는 모습처럼 보이도록 가능하다.적용 가능한 상황: 순수 JS를 이용해서 SPA를 만드는 경우이용 기능: window.history알아두면 좋은 내용History.length 읽기 전용현재 페이지를 포함해, 세션 기록의 길이를 나타내는 정수를 반환합니다=> 실제로 경험해보니, 브라우저 처음에 들어가는 경우, length가 3이다.=> 하나씩 증가하는데, 뒤로 간다고 해당 length가 줄어들지는 않는다.=> 결국 초기값만 의미가 있을 뿐, 그 이후 의미가 없는 값으로 생각해야 한다.해당 값이 읽기 전용인 이유는 브라우저에서 보안상 history 정보를 공유할 수 없기 때문이다.사용하는 기술 CookBook1. his..
Spring Boot를 이용해서 개발을 진행하면 @Transactional이란 어노테이션을 이용하여 데이터의 영속성을 지키고자 한다. 제대로 알고 사용하는 것일까? 프록시조차 모르는 나는 Spring Boot의 의도에 대로 비즈니스 로직에만 신경을 쓰는 것이었을까? 오늘은 그저 사용 중이었던 @Transactional에 대한 내 생각을 서술한 글을 쓴다. @Transactional을 제대로 이해하려면 유튜브 뉴렉처 강의가 직관적이었다. Spring 자체를 이용해본 적이 없기 때문에 Bean을 xml에 직접적으로, 프록시를 직접적으로 설정해서 AOP를 구현하는 것을 본 것이 이해가 잘 가는 부분이었다. https://www.youtube.com/watch?v=y2JkXjOocZ4&t=2s 문제는 그 다음이..
 [프로그래머스]디스크 컨트롤러
https://school.programmers.co.kr/learn/courses/30/lessons/42627# 프로그래머스 코드 중심의 개발자 채용. 스택 기반의 포지션 매칭. 프로그래머스의 개발자 맞춤형 프로필을 등록하고, 나와 기술 궁합이 잘 맞는 기업들을 매칭 받으세요. programmers.co.kr 문제 설명보다는 기존 다른 코드와 다른 점을 설명하고자 한다. https://school.programmers.co.kr/learn/courses/14743/lessons/118891 프로그래머스 코드 중심의 개발자 채용. 스택 기반의 포지션 매칭. 프로그래머스의 개발자 맞춤형 프로필을 등록하고, 나와 기술 궁합이 잘 맞는 기업들을 매칭 받으세요. programmers.co.kr 위 링크에서 문..
새로 알게 된 것 set num(gems.begin(), gems.end()); 중요하다고 생각한 것 1. for문 한번만 돌아야 된다. 2. 도는 것을 굳이 나눠서 첫 번째 초기값을 따로 구하지 않아도 된다. 더 생각해볼 것은 하나의 케이스에 메몰되지 않고, 더 다양한 케이스에 대해서 고민해볼 것 #include #include #include #include #include using namespace std; vector solution(vector gems) { vector answer(2); unordered_map m; set num(gems.begin(), gems.end()); int start = 0; bool isFirst = true; for(int i=0; i 1) { m[ gems..
개인 프로젝트를 할 때엔 Vuejs, React 라이브러리를 기본으로 또는 이를 쓰는 프레임워크를 이용해서 개발을 진행했었다. 하지만 취직한 곳에서는 NodeJs기반의 프론트 프로젝트를 진행하지 않았고 그런 이유도 어느정도 납득 가능한 부분이었다. 백엔드 개발과 프론트 엔드 개발을 나누는 것이 좋지만, 인력이 두 배 이상으로 들 수도 있고 꽤나 여러 사람이 피곤해질 수 도 있다고 생각한다. 사수분은 리액트를 사용해본 적이 없기 때문에 왜 좋냐고 물어보았을 때 구체적인 이유를 이야기할 수 없었다. 지금은 스코프에 대한 이해가 있어서 이를 설명하겠지만 그 당시에는 제이쿼리도 다른 프레임워크만큼 나쁘지 않게 보였기에 이야기 할 수 없었다. 왜 제이쿼리가 좋아보였는가? 사실 그 이유보다는 타임리프에 대한 편리한..
 광물 캐기 C++ 분석
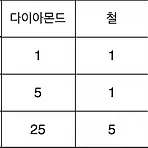
https://school.programmers.co.kr/learn/courses/30/lessons/172927 프로그래머스 코드 중심의 개발자 채용. 스택 기반의 포지션 매칭. 프로그래머스의 개발자 맞춤형 프로필을 등록하고, 나와 기술 궁합이 잘 맞는 기업들을 매칭 받으세요. programmers.co.kr 문제의 조건을 확인 곡갱이 종류별로 5개, 미네랄 50개 생각할만한 방법 제일 완벽하고 만능인 방법이 뭘까, 모든 방법을 탐색하고, 최적의 값을 가져오면 된다. 주먹구구식으로 값 찾기 모든 방법을 탐색하는 데 탐색을 몇 번 해야하나? 곡갱이가 총 15개이기에, 곡갱이를 총 곡갱이를 모든 조합을 구한다면 15!이 되고, 이는 1e9를 넘어간다. 문제의 조건 확인하기 문제의 조건에서 미네랄이 총 5..
 Currying/Partial Application 인수를 하나를 받아, 복잡도를 낮추는 방법
중첩 함수는 나쁜 아이가 아니에요 대게 함수를 중첩 해서 사용은 가능은 하지만 잘 하지 않는다. 그런 이유는 코드가 복잡해지고, 코드가 난해하다는 느낌이 들기도 하기 때문이다. 하지만 중첩 함수가 괜찮은 친구처럼 보이는 경우는 언제일 수 있을까? 내가 생각했을 때엔 응집도를 고려했을 때가 아닐까 싶다. 보통 코드에 대한 응집도를 높이기 위해 관련 있는 코드끼리 모아두려고 한다. 그래서 클래스를 사용한다고 본다. 그런데 클래스에 들어가는 함수에서, 함수를 호출하는 경우 코드가 복잡해지는 경향이 있다. 왜 그런가 싶으면 코드가 떨어져 있어 연결되어 있음을 볼 수가 없다. 그래서 코드를 파악하기 힘들다. 중첩 함수가 괜찮은 녀석인지 보기 위해 코드를 하나 봐보자. function order(menu) { co..